Monday, 28 May 2018

How to Create a Facebook Ad With Business Manager

Want to use Facebook for advertising?
Wondering how to create your first Facebook ad using Business Manager?
In this article, you’ll learn how to create a Facebook page post ad using Facebook Business Manager.

#1: Set Up Facebook Business Manager

If you don’t already have a personal Facebook profile, creating that profile is your first step. Next, you need to create a separate Facebook page for your business. After you create a Facebook page for your business, you can create a Business Manager account that allows you to run ads for your page.
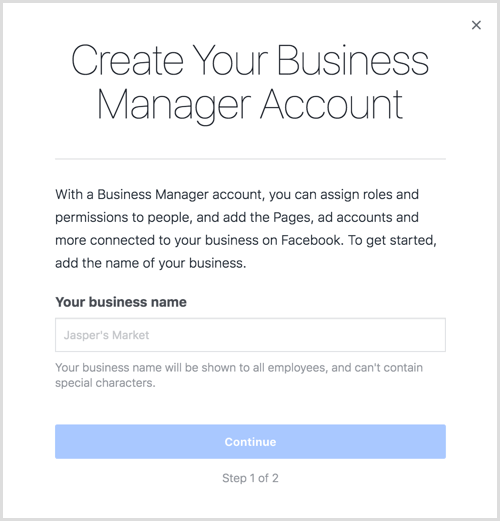
To begin, go to the Business Manager home page and click Create Account in the upper right. You’ll need to log in using the email and password you used to set up your personal Facebook profile.
Next, enter your business name and email to set up your Business Manager account. When you’re done, click Finish.
Enter your business name to create your Business Manager account.
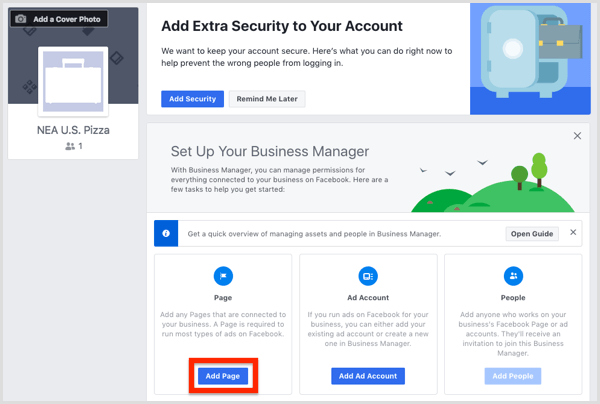
Now you’re ready to add your Facebook page to your new account. On the Business Manager home page, click Add Page.
Click Add Page to add your Facebook page to Business Manager.
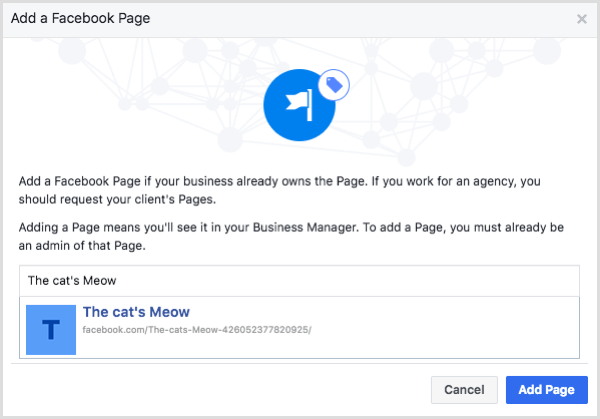
In the next window, click Add Page under Add a Page of Your Own. Then select your Facebook page and click Add Page. Your page is now added to Business Manager.
Select your Facebook page and click Add Page.
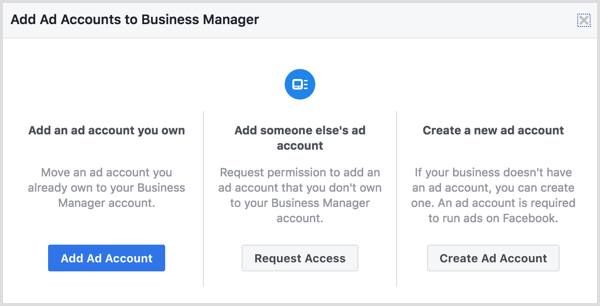
Next, you need to add your Facebook ad account. On the Business Manager home screen, click the Add Ad Account button.
Click the Add Ad Account button.
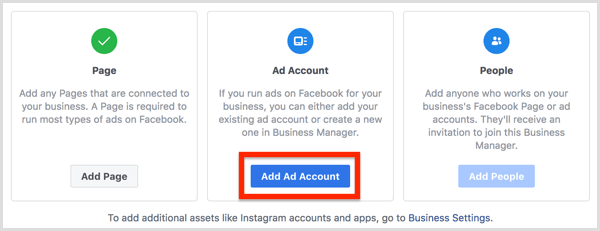
From here, you can either add an existing ad account or create a new ad account.
Add an existing ad account or create a new ad account.
If you’re creating a new ad account, use your business name when asked to name your new account. This name doesn’t appear publicly but helps you and any employees you add to the account to identify what it’s for.
Use your business name when asked to name your new Facebook ad account.
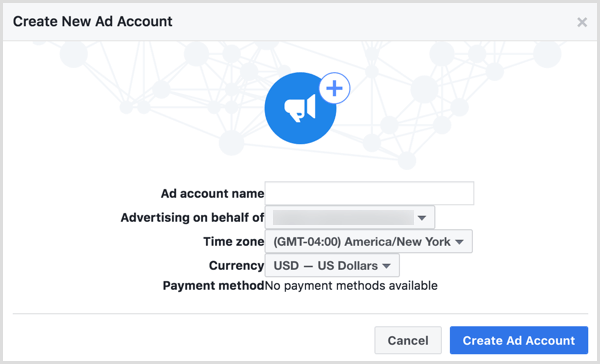
When you’re done, click Create Ad Account and you have the foundation to start advertising through Business Manager.
Manage Employee Access to Your Facebook Ads Account
The Business Settings option in Facebook Business Manager is your go-to tool for handling administrative tasks related to Facebook ads like changing your billing information and managing employee access. Because you just set up your Business Manager account, this section focuses on giving an employee access to your business’s Facebook page and ads account.
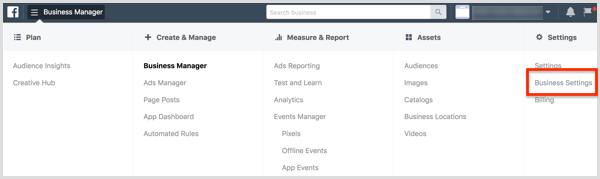
To start, open Business Managerclick the menu icon in the upper left to open the menu shown below, and select Business Settings on the right.
Select Business Settings from the Business Manager menu.
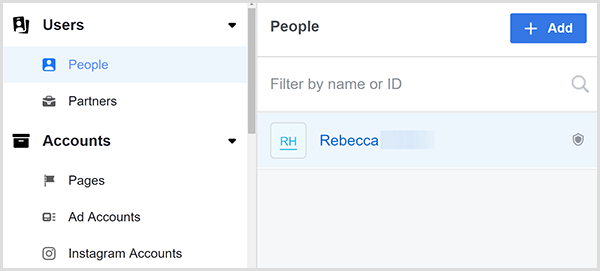
On the Business Settings page, make sure People is selected under the Users heading on the left. On the right, you see all of the users you’ve added. If this is a new account, you’ll be the only user. To add someone else, click the Add button in the upper right of the People column.
Click the Add button in the upper right of the People column.
The Invite People dialog box appears, which walks you through the settings you can choose as you add someone to your account.
First, type the email address of the person you want to add. Then select whether to give Employee Access or Admin Access. You typically want to provide Employee Access, which allows you to limit the pages the person has access to and actions they can take.
Select whether to give Employee Access or Admin Access.
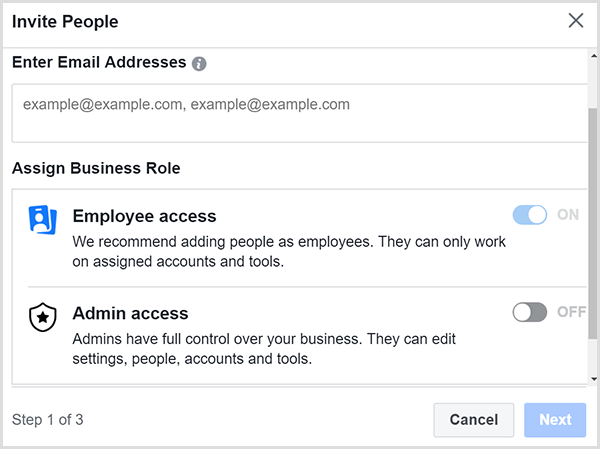
Click Next, and you see a screen that lets you give your employee access to any page connected to your Business Manager account.
When you give an employee access to the page, they can create posts that are shared with your page followers and anyone who visits your page. If you give the employee access to the ad account, they can create and monitor ads via the backend of your Facebook page.
This screen lets you give your employee access to any page connected to your Business Manager account.
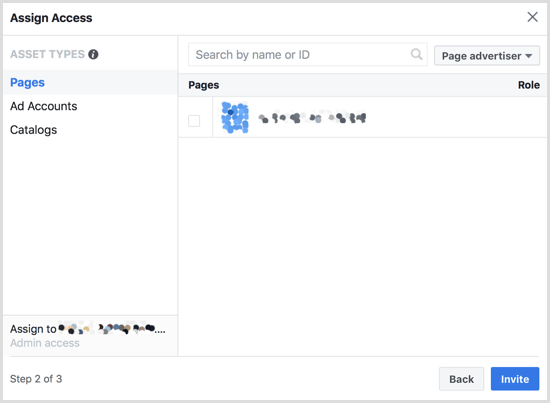
When you’re done assigning access, click the Invite button, and you see a confirmation that your invitation was sent to your employee’s email address.

#2: Install the Facebook Pixel

To set up the basics for Facebook advertising, you also need to install the Facebook pixelonto your website. Although using the Facebook pixel is optional, it offers key benefits for advertisers.
The pixel is a tracking code that allows Facebook to identify people who visited your websitecreate custom audiences of those visitors, and then show ads to those custom audiences. (These ads are a type of retargeting.) The pixel can also help you identify potential customers based on their similarity to people who visit your website (also called a lookalike audience).
To begin the process of adding the Facebook pixel to your website, open Business Managerclick the menu icon in the upper left, and select the Pixels option from the Measure & Report column.
Select Pixels from the Business Manager menu.
On the screen that appears, click the Create a Pixel button. Before you create the pixel, make sure you read and understand the terms for using the Facebook pixel. Then check the pixel name and click Create when you’re ready.
Add a name for your Facebook pixel and click Create
Facebook takes a moment to create your pixel and then shows an Install Your Pixel Code dialog box. Select the method you plan to use for installing your pixel from the three options: with a tag manager, manually, or by emailing the code to a developer.
For this example, select the Manually Install the Code Yourself option. After you click that option, scroll down to see the pixel code to copy and paste into the head tag of your website. To copy the code, you can click the Copy Code to Clipboard option.
Click the Copy Code to Clipboard option.
The steps for adding the Facebook pixel code to your website depend on how you’ve set up your site. To illustrate, the way you install the pixel on a WordPress-based site differs from steps for a Wix-based website.
After you install the pixel on your site, scroll down to the bottom of the Install Pixel Code dialog box to test whether it fires correctly. You simply enter your website addressand click the Send Test Traffic button. If the testing feature’s No Activity Yet status doesn’t show a change, you have an issue that you need to troubleshoot and fix before you can use the pixel for your ads.
When your Facebook pixel is working, click the Continue button.
Enter your website address and click the Send Test Traffic button.
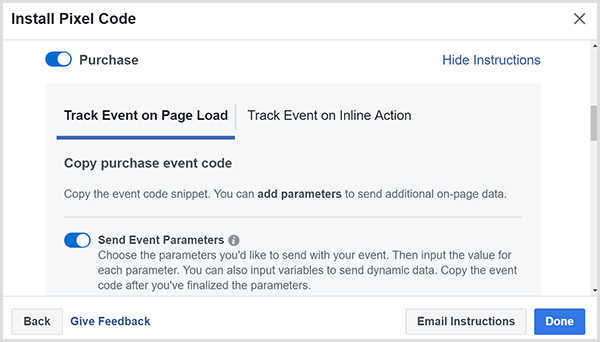
On the next screen, you can set up tracking of events for each web page a customer visits. Think of an event as an action customers can take on your website. Say a customer makes a purchase and then sees a thank-you page. If you set up a Purchase event pixel on the thank-you page, you can distinguish people who ordered something from casual visitors.
Setting up events, such as the purchase event, is important because you can then show targeted ads to people who bought your goods or services, and you can use lookalike audiences to target potential customers who fit the profile of your current customers.
The event options you see in the Install Pixel Code dialog box include Purchase, Generate Lead, Complete Registration, Add to Cart, and View Content. To see the code you copy and add to a web page to track that event, click the toggle next to the event name.
For instance, here you see the details that appear for the Purchase event.
Copy the Purchase event code.
Tip: If you use the Chrome web browser, you can use the Facebook Pixel Helperextension to see whether your pixel is working and see how the pixel is implemented on other websites. With this extension, you can identify both general and event pixels on every website.
Use the Facebook Pixel Helper extension to see whether your pixel is working.
If your pixel is installed correctly, you start to see activity like that in this example for TJ’s Burgers.
Facebook pixel activity.

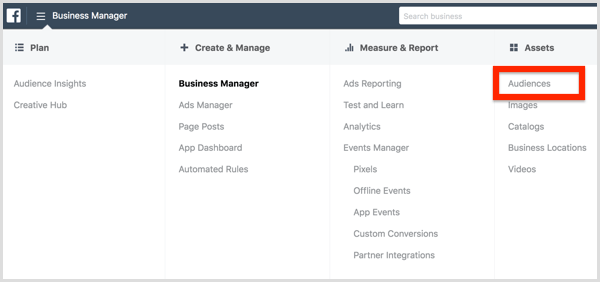
#3: Create Audiences to Target Users

With the Audiences tool, you can create and save audiences that are most relevant to your brand.
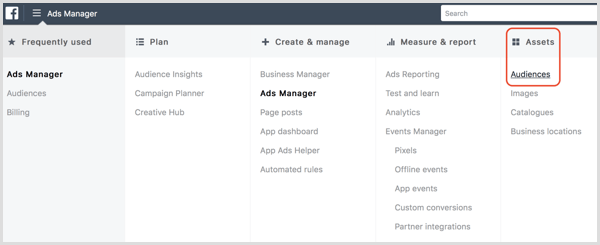
To access this tool, open Business Managerclick the menu icon in the upper left, and select the Audiences option from the Assets column.
Select Audiences from the Facebook Business Manager menu.
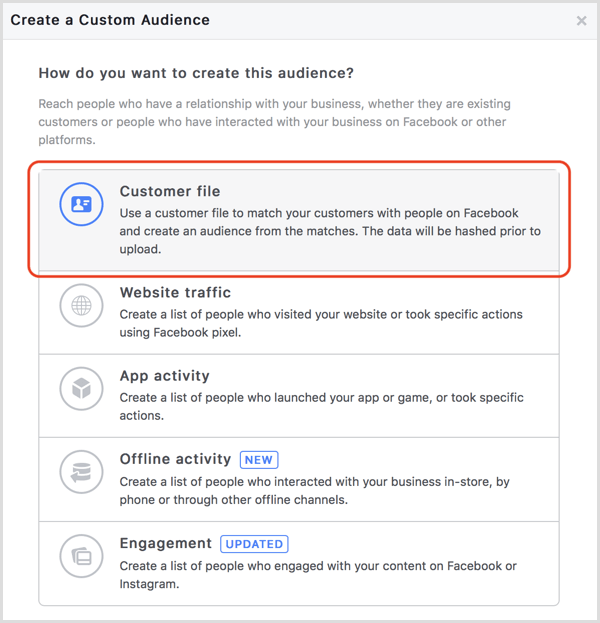
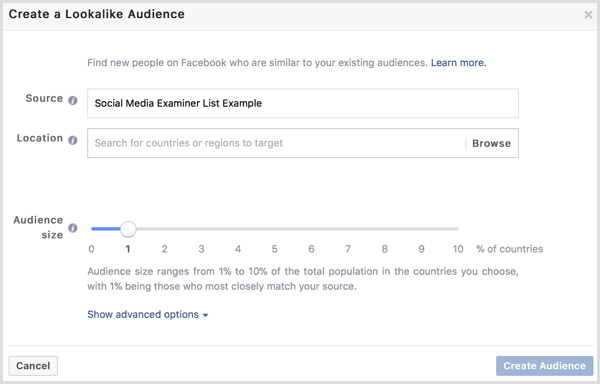
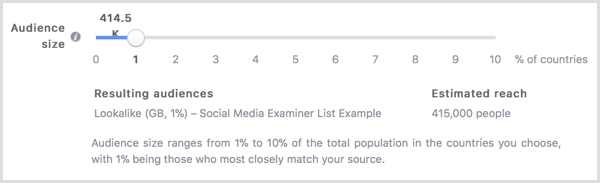
When you first open the Audiences tool, it asks what type of audience you’d like to create: custom audience, lookalike audience, or saved audience.
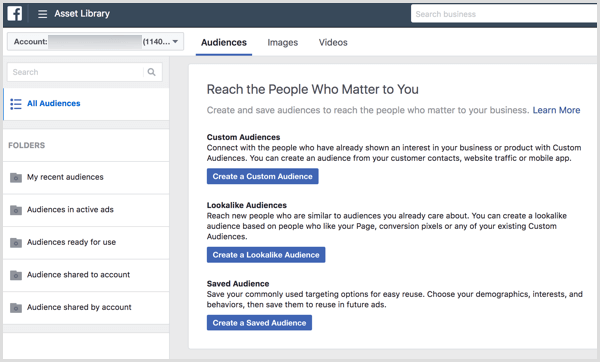
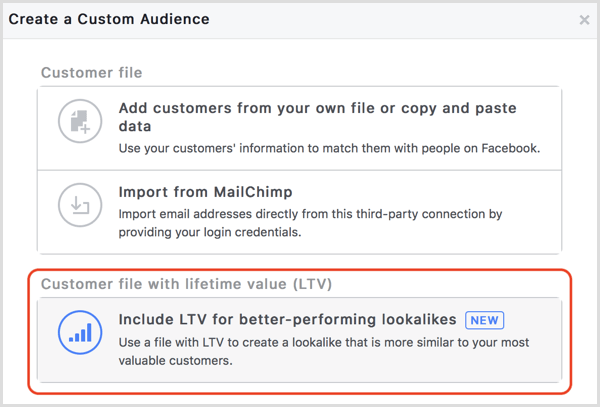
When you first open the Audiences tool, it asks what type of audience you’d like to create.
custom audience is based on customers taking action with your brand, such as interacting with your Facebook page. A lookalike audience uses artificial intelligence to create audiences that closely resemble people you’ve already been able to identify. In other words, a lookalike audience finds people who resemble audiences you’ve created.
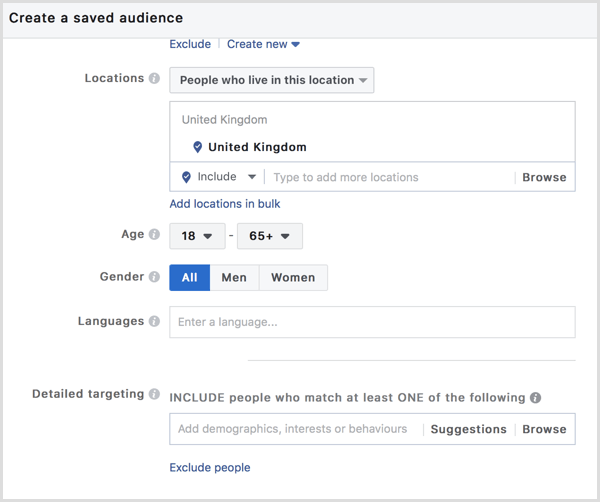
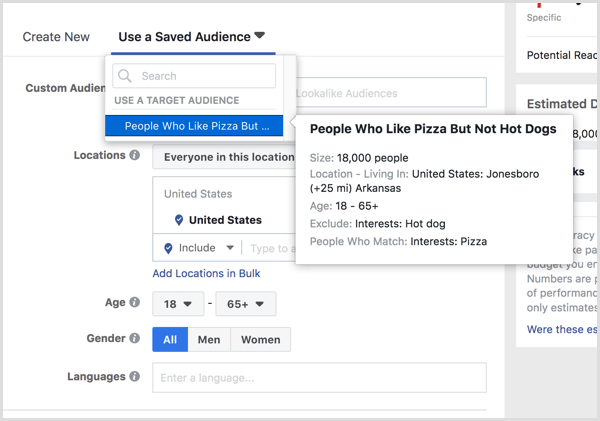
saved audience is an audience of people who share certain behaviors, interests, or demographics. If you’re a local business getting started with Facebook advertising, a saved audience can be a good way to start showing targeted ads.
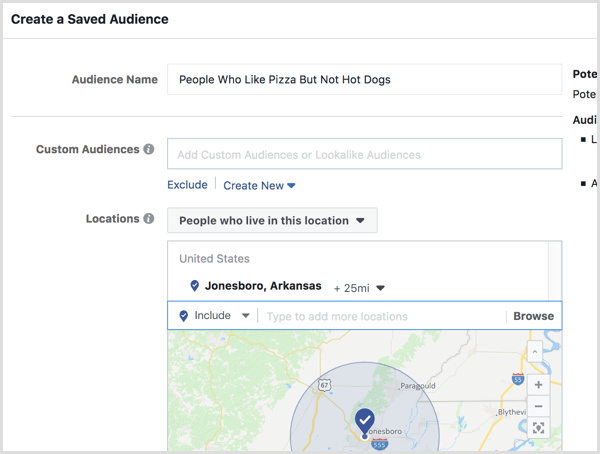
To create a saved audience, click the Create a Saved Audience button and give your audience a name that helps you identify whom it targets. From there, you can select attributes you want to include in your saved audience.
To illustrate, if you’re a local business, make sure you limit your audience to people in your area. Based on your knowledge of how far people travel to buy from your establishment, you can even limit that to a certain radius, such as 10 miles.
Set up location targeting for your saved audience.
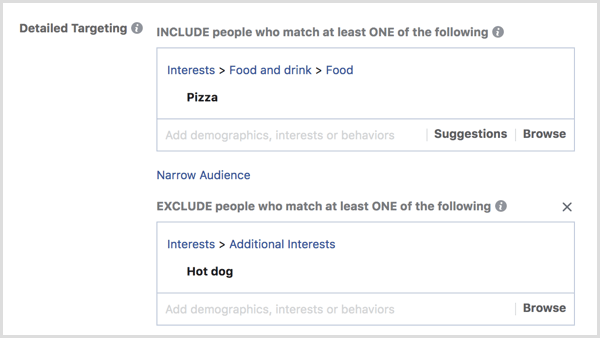
In addition to location, you can target people who fit a certain demographic or have specific interests and behaviors. You’ll find these options below the location targeting options, so simply scroll down to find them. For example, if you own a pizza restaurant, you can target people who like pizza. Just type “pizza” into the detailed targeting area.
You can also use exclusions or add a second attribute to narrow your audience.
Use exclusions to narrow your saved audience.
After you click the Create Audience button, the audience is saved and you can choose to target this audience when you create Facebook ads.

#4: Create a Facebook Ad From a Facebook Page Post

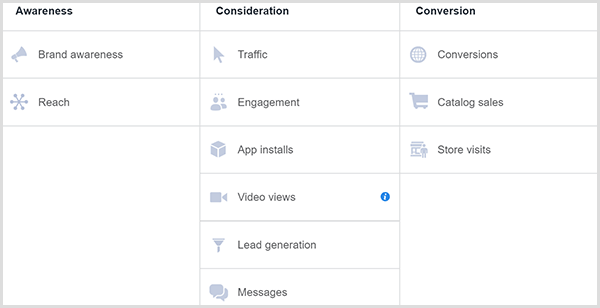
Now you’re ready to create the ad itself. Before you proceed, it’s important to know that Facebook Ads Manager categorizes each campaign at three different levels. At the highest level, the campaign category, you pick the objective, which is what you want your ad to accomplish. Do you want more clicks, sales, video views, leads generated, or something else? Then you set up the ad set and ad itself.
To get started, open Ads Manager.
Select Ads Manager from the Facebook Business Manager menu.
On the Campaigns tab, click Create.
Click Create on the Campaigns tab.
Now you’re asked to choose an objective. The marketing objectives are broken into awareness (how many users you can get to see your post), consideration (how many people you can interest in your product), and conversion (ultimately getting people to buy your goods or services).
Select a campaign objective.
Choosing the right objective depends on your marketing strategy. You can choose among many approaches, and it’s up to you to find out what works best for your business. The more expensive your product or service, the more trust you must build with your potential customers.
After selecting your campaign objective, you create the ad set. At this level, you choose the audience you’re targeting, select the placement (where your ads will be seen with Facebook’s advertising platform), set the budget, and decide when your ad will be seen.
For the audience, you can select an audience you’ve already created and saved, or create and save the audience while you set up a campaign.
Select an audience you’ve already created and saved.
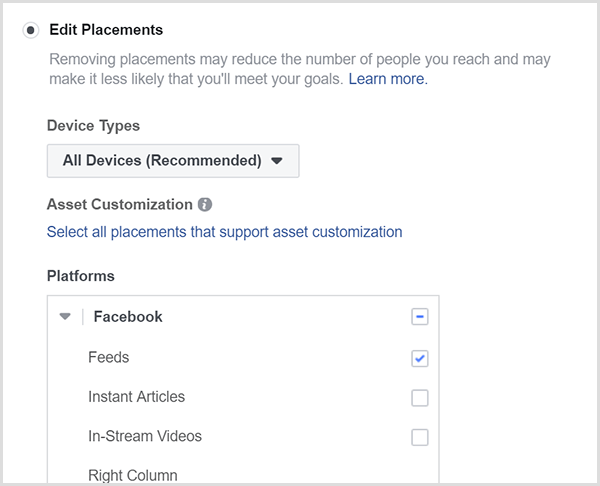
After you select an audience, choose Edit Placements to see your options, which include different device types, as well as options within Facebook, Instagram, and throughout Facebook’s Audience Network (banner ads with partnered websites). When you place your first adstarget only the Facebook news feed. Later on, you can test how other placements work for your business.
Choose Edit Placements to see your placement options.
Next, you decide how much you want to spend running your ad and when you want the ad to be seen. If you aren’t sure how much to spend or how long to run your ad, start with a low budget of $30 and run the ad for 5 days.
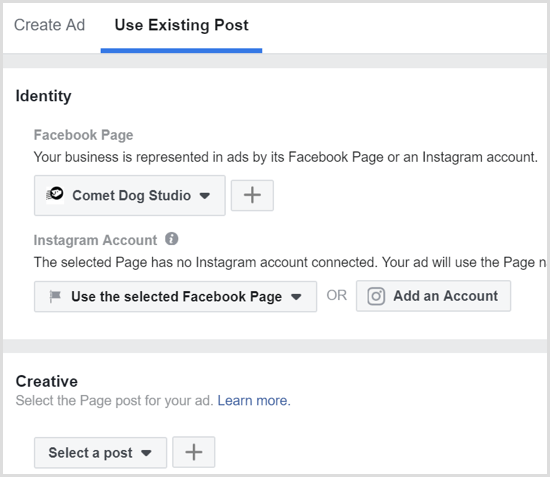
After you click Continue, you create the actual ad that your customers see as they scroll through Facebook. If you have multiple Facebook pages, make sure you select the page that’s associated with the ad you want to show. For your first ad, select a post you’ve already published on your page.
Select a post you’ve already published on your Facebook page.
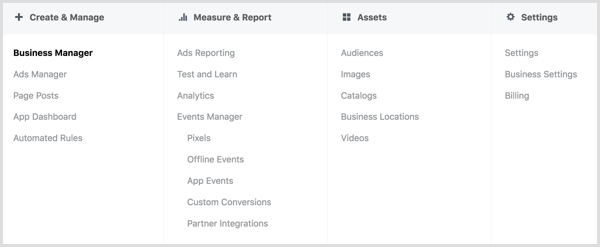
After you click Confirm to create your ad, everything you need is on the Ads Manager menu. The easiest way to understand each option is by exploring each column the tabs are in.
For instance, in the Measure & Report column, you can find tools that help you track your campaigns. The Assets column has tools for creating online catalogs, storing videos, and separating your local businesses if you have several locations.
Explore the options in the Facebook Ads Manager menu.
Conclusion
As the Internet continues to eat into small establishments’ profitability, it’s imperative that small business owners understand how online marketing works and how social media marketing can help their local business. Facebook advertising is a complex platform, but to get started, you can focus on a few basics so you don’t become overwhelmed.
Start by setting up the foundation, creating a simple audience, and running an ad based on an existing post on your Facebook page. This start will give you the basic understanding you’ll need to continue learning about the plethora of options and marketing tactics the platform offers.

What do you think? Have you tried running Facebook ads for your local business? What ideas from this article will you try? Please share your thoughts in the comments.


Tuesday, 22 May 2018

How to Use Customer Lifetime Value to Clone a Facebook Audience

Need to increase the effectiveness of your Facebook ads?
Want to target better-quality audiences with your ads?
In this article, you’ll discover how to reach a highly targeted lookalike audience of your best customers using Facebook custom audiences and lifetime value.

#1: Prepare Your Current Customer Data for Optimal Match Rate in Facebook

The first step in the cloning process is to prepare your customer data for optimal match rate in Facebook.
Before you upload your file, you need to format it to maximize the match rate. You can include up to 15 identifier fields. The more fields you include, the higher your match rate will be because there’s more data for Facebook to match against.
Facebook customer file indicators
When creating your spreadsheet, ensure that each identifier you want to match is in its own column. This includes separating names into First Name and Surname columns.
One key field that improves your match rate is the Country/Region field. Even if all of your data is from the same country, you still want to include a country field. Facebook matches data on a global scale, so this step helps it match as many people as possible from your customer file.
Finally, ensure that your customer file is in .CSV or .TXT format. These are the only two file types that Facebook accepts when manually uploading data to create a customer file custom audience.

#2: Create a New Custom Audience in Facebook

The next step in the cloning process is to create a customer file custom audience. You upload your email list and Facebook will try to match the people to their profiles on Facebook.
First, navigate to the Audiences dashboard in Facebook Ads Manager. In the main menu under Assets, click Audiences.
Facebook Ads Manager Audiences dashboard
Next, click Create Audience and select Custom Audience from the drop-down menu.
Facebook lets you create five core custom audiences. From the list of custom audiences, select Customer File.
Facebook create custom audience from email list
This opens a new pop-up window with three options asking how you want to upload your data. The first option is to manually upload a customer file, or copy and paste the data. The second is to directly import data from your lists through the MailChimp integration. Finally, you can create a customer list custom audience that features the lifetime value (LTV) of your customers.
Select the Add Customers From Your Own File or Copy and Paste Data option. In this example, we’re going to upload data that has been exported from a CRM system.
Facebook custom audience add customers from file

#3: Upload Your Customer Data File and Map the Identifiers

After you select the Add Customers From Your Own File or Copy and Paste Data option, another pop-up window appears with the four-step process for creating your customer file custom audience.
The first step is to upload your list. Or you can copy and paste it using the option below that.
Facebook upload customer data
Once you’ve uploaded your customer file (formatted using the tips mentioned earlier), the next step is to map your identifiers.
Select the relevant identifier with each column in your file. Once you’ve mapped all of the relevant identifiers, click Upload & Create.
Facebook preview and map identifiers
The next step is where your customer list is hashed locally on your browser and then sent to Facebook. There, Facebook matches your customer data against Facebook’s existing list of their users’ hashed IDs and the matches are added to your custom audience.
Your customer file custom audience will now appear in your Audiences dashboard with a blue populating status. This means that Facebook is building your custom audience. It can take up to 30 minutes to populate.

#4: Create a Lookalike Audience of Your Current Customers

After you’ve created your customer file custom audience, step 4 in the audience creation process offers you two options. You can create a lookalike audience or a campaign that will use the customer list custom audience. Select Create a Lookalike Audience.
Facebook create lookalike audience
The lookalike audience creation window now appears. The customer list custom audience you just created is already selected as the source audience in the Source field.
Next, choose the target country for your lookalike audience. For instance, if your target audience is in the UK, choose United Kingdom from the drop-down list of locations.
Facebook create lookalike audience
Finally, select your lookalike audience size. Facebook lets you choose from a sliding scale of 1% to 10%. This represents a 1% to 10% sample of the total Facebook audience size in the country or region you set in the Location field. Your 1% will be a smaller audience than your 10%, but it will be the closest match to your source audience of your customer data.
Start by creating a 1% lookalike. Then to reach more people, repeat this process changing the audience size to 2%, 3%, 4%… all the way up to 10%.
Facebook create lookalike audience
Your lookalike audience quality is influenced by the size of your source audience. The larger your source audience, the more matched data in your customer file custom audience and the better quality your lookalike audiences will be.
Having tested different source audience sizes for creating effective lookalike audiences, we’ve found that a minimum of 1,000 is a good starting point.

#5: Use Lifetime Value to Improve Lookalike Audience Quality

You can use the LTV of your customers as an additional identifier field when creating your customer file custom audience.
To do this, navigate to your Audiences dashboard and click Create Audience. From the drop-down menu, select Custom Audience, and then choose Customer File.
Next, select the bottom option to include your LTV.
Facebook create custom audience with LTV
When you prepare your datause the optimal guidelines outlined earlier. Also, be sure to include a field with the LTVs related to each of the customers in your file.
For ecommerce companies using platforms like Shopify or WooCommerce, you can easily export your customer data and include purchase values.
Follow the same process to create your customer file custom audience as outlined earlier in the article. This time though, there’s an extra step to match the value column in your file to the LTV identifier.
Facebook create custom audience with LTV
When to Use Lookalike Audiences and How to Scale With Them
Facebook lets you use three types of audiences at the ad set level: saved, custom, and lookalike audiences. The effectiveness of these audiences can vary depending on the “temperature” of the audience, coupled with the positioning and messaging of ads you present to that audience.
Saved audiences are the most basic type. They let you use demographic information and the detailed targeting feature to target people through interests and behaviors. These are cold audiences of people who are unfamiliar with your business.
Facebook create saved audience
Next you have custom audiences, which consist of people who have engaged with your business either on Facebook or on your website. These are warm and hot audiences of people who are familiar with your business because of the previous interaction they’ve had with you.
The third type of audience is the lookalike audience. These are cold audiences just like saved audiences but they’re better targeted. They use a source audience that you control to find new people who share the same characteristics as the people in your source audience.
Now that you’ve created highly targeted cold audiences of people who are similar to your customer database, what campaigns and ads should you show to these new lookalikes?
Because lookalike audiences are cold, it’s best to use them at the Awareness stage of the ALL framework to position valuable video content to start to warm them up.
Here’s a list of Facebook ad examples you can use as inspiration for targeting your new lookalike audiences.
Conclusion
Cloning your existing customers by creating lookalike audiences from your database is one of the most effective ways to produce highly targeted audiences on Facebook. With better targeted audiences, you’ll see better results compared to saved audiences built from interests and demographics.
This is a great competitive advantage over businesses that don’t have the customer data in the first place or don’t know the cloning process.

What do you think? Do you use lookalike audiences in your Facebook ads targeting? What tips can you share for creating better-quality audiences to show your ads to? Please share your thoughts in the comments below.


Monday, 21 May 2018

How to Reshare an Instagram Post to Your Instagram Stories

Wish you could easily reshare someone else’s Instagram post?
Have you heard of Instagram’s Add Post to Your Story feature?
In this article, you’ll discover how to add any public post to your Instagram story and how this feature can benefit your business.

Find Out if You Have the Instagram Reshare Feature

The Instagram reshare feature is currently being tested only with a select audience. Not everyone will have access to it. Even I don’t have it yet, but fortunately, my friend with @tickletreestudio does and she granted us permission to use her account to show you the features.
To find out if you have access, select any public post from any public account(including your own). Tap on the Message or Send To button (the icon under the post image that looks like a paper airplane). If you have the option to Add Post to Your Story, then you have this feature!
Look for the Add Post to Your Story option to see if you have access to the Instagram reshare feature.
Note that Instagram gives accounts the option to block this sharing feature. If you check a post and you don’t have this option, the account may have it disabled. You may want to check more than one account to see if you actually have access to the feature.

#1: Reshare Posts to Your Story

This new reshare feature is a prelude to an official “regram” feature within Instagram. It’s not a fully operational regram tool as many of us would like. In this current testing version, you can share an Instagram post (from the regular feed) to your own Instagram story. You can’t reshare it to your own Instagram feed.
The process to share a post is relatively quick and easy.
Select the Post to Add to Your Story
Choose any post, including one of your own, that you want to share. Tap the Send To button and choose Add Post to Your Story (as mentioned above).
A new story post will open. Instagram’s technology automatically selects a gradient of colors for the background based on the colors in the post image. The original post is a square image with the original username of the account beneath it.
A reshared post in your Instagram story shows the original post as a square image with the username of the account beneath it.
Edit Your Story Post
Now that you have the story post open, edit your story as normal to add more context to your reshared post. You can drag and resize the reshared post image and add text, stickers, or other components to it.
Add text, stickers, or other components to a reshared post in your Instagram story.
If you don’t like the color of the background that Instagram applied to the post, you can change it. First, tap the pencil icon.
Tap the pencil icon to change the background color of a reshared Instagram post.
Then choose a color, and tap and hold the background of the post to fill it with the color of your choice.
Tap and hold the background of a reshared Instagram post to fill it with the color of your choice.
Tag the Original User
Unfortunately, with the current testing version, although the original username is listed beneath the photo in the story, the original user isn’t actually tagged in the post. They won’t receive a notification you’ve shared their post.
In this situation, it’s good etiquette to give proper attribution by adding a text box that lists the original user and tagging them in the post so they receive a notification.
Add a text box that lists the original user and tag them in a reshared Instagram post.
Upload Your Story
Now complete your story post upload like normal, and you and your followers will be able to see it on your profile.

#2: Interact With Reshared Posts

When a user has reshared a post to their story, you can tap on the story and then tap the See Post button to go directly to the original post from that user.
Tap on a reshared Instagram post and then tap the See Post button to go directly to the original post from that user.
Once you open the original post, you can engage with it as normal, liking or commenting on it.

#3: Edit Your Post Sharing Settings

By default, your account allows others to share your posts. Everyone should currently have this option in their account settings.
There may be a situation, however, where you don’t want other accounts to be able to share your posts to their stories. You can prevent this, even if you don’t have the reshare feature now, by editing your settings in Instagram.
Tap on the gear icon on your profile and scroll down to the Allow Others to Reshare option. If the slider for this option is on (and blue), people currently have the ability to share your posts. To disable this setting, tap on the slider to turn it off.
Tap the Allow Others to Reshare option to disable sharing for your public Instagram posts.

#4: Legal Considerations for Resharing

There are always legal considerations around posting someone else’s content on social media. They own the copyright to the original work and you require permission to reuse their content.
Many “share” functions on platforms like Facebook and Twitter allow users to skirt around copyright because they’re sharing the original post with attribution. This new reshare feature on Instagram works more like these sharing functions and many users will use this tool without considering the rights of the original user.
It’s always best practice to ask permission before resharing someone’s content. Because this new feature is for Instagram, many users will likely be happy to see their content shared. But that shouldn’t discourage you from asking for their permission first.
This will be especially true when resharing content that customers have posted about your product or service. If you’re sharing content that can be shown to drive financial rewards for your business by using their posts as testimonials, you want to make sure you have explicit permission from them (via a comment on their post or a direct message) to reshare that post.
Ask customers for permission to reshare their post on Instagram.
Once you have permission, have fun with the reshare feature! Enjoy adding more variety to your stories’ content and providing more value to your audience.

#5: 5 Creative Ways to Use Reshared Posts

Just as many of us like to regram posts on Instagram, this reshare feature offers a variety of ways to augment your content strategy for Instagram Stories. If you have this feature, you may want to consider resharing posts in these ways:
  • Showcase how your customers use your product or service.
  • Highlight local events or venues near your business.
  • Provide educational tips from industry leaders.
  • Share breaking news or updates related to your industry or audience.
  • Cross-promote your own Instagram posts to your stories for added reach to more of your audience.
Even if you don’t currently have the reshare feature, it would likely be advantageous for your brand to enable the resharing function. If your followers or others have access to the feature, they’re able to share your posts to their audiences. This can provide more reach and exposure to new audiences and drive more engagement on your own posts, while potentially leading to more followers.
When this feature rolls out to more users, I can see it being a great way to conduct contests (there aren’t currently any restrictions on being able to reshare posts on Instagram contests), requiring a reshare of your post to enter.
Conclusion
The reshare feature is still currently being tested and many users don’t have access to it. This has been a common request for years, however, and we can assume that this feature, or a very similar version of it, will be rolling out to all users in the near future.

What do you think? Do you have the reshare feature and are you taking advantage of it? Are you eager to get your hands on this feature? Please share your thoughts in the comments below.


Commission Hero Review (2020) — Legit?

Hello Friends Today I have brought my  Commission Hero review  for you (updated 2020). For this review, I have spent around 12 hours (5 hour...